With our architecture and hardware selected, and our homelab designed, let’s go ahead and build a homelab to experiment with!
I’ll be using Proxmox as my type-1 hypervisor example, and Virtualbox as my type-2 hypervisor example. You can view the Virtualbox guide here.
Tools & Images
Hypervisors
Proxmox
VmWare Player
Virtualbox
You can get Windows Evaluation Licenses here:
Windows Server 2022
Windows 11 Enterprise Evaluation
Linux VM’s and Images
Kali VM
Ubuntu Desktop
Ubuntu Server
PfSense
Splunk
Splunk Enterprise Download page
Proxmox
The first thing you want to do is head over to the Proxmox website and download the iso image.
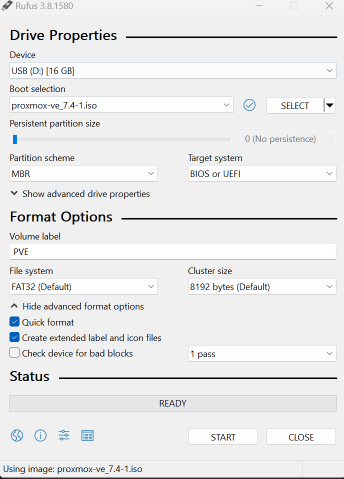
Next, you’ll want to burn the image to a USB flash drive, via a software program like Rufus or unetbootin.
Boot Proxmox on the machine you’d like to install it on and follow the install instructions. Install instructions are pretty simple and straightforward, just make sure the machine you’re installing it on is internet connected.
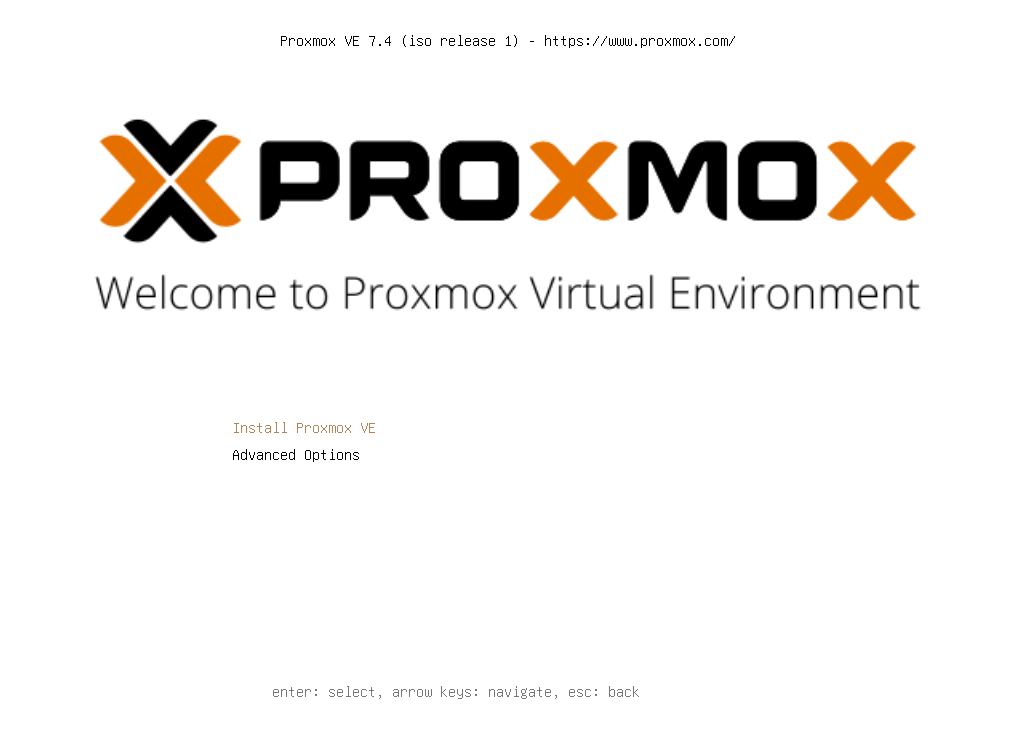
After, getting through all the steps you should see the screen below which means you’re ready to install Proxmox to your system. Proxmox will replace the OS on your system so be sure to choose a host computer you don’t plan on using for anything else.

Upon launching your new proxmox installation you will need to navigate to the following URL in order to access your Proxmox management console:
https://ipaddress:8006
There you can log in as the root user with the password you configured during installation. Upon logging in you’ll see a brief error message about not having a valid subscription. Simply ignore it as it’s referring to the enterprise version of Proxmox.

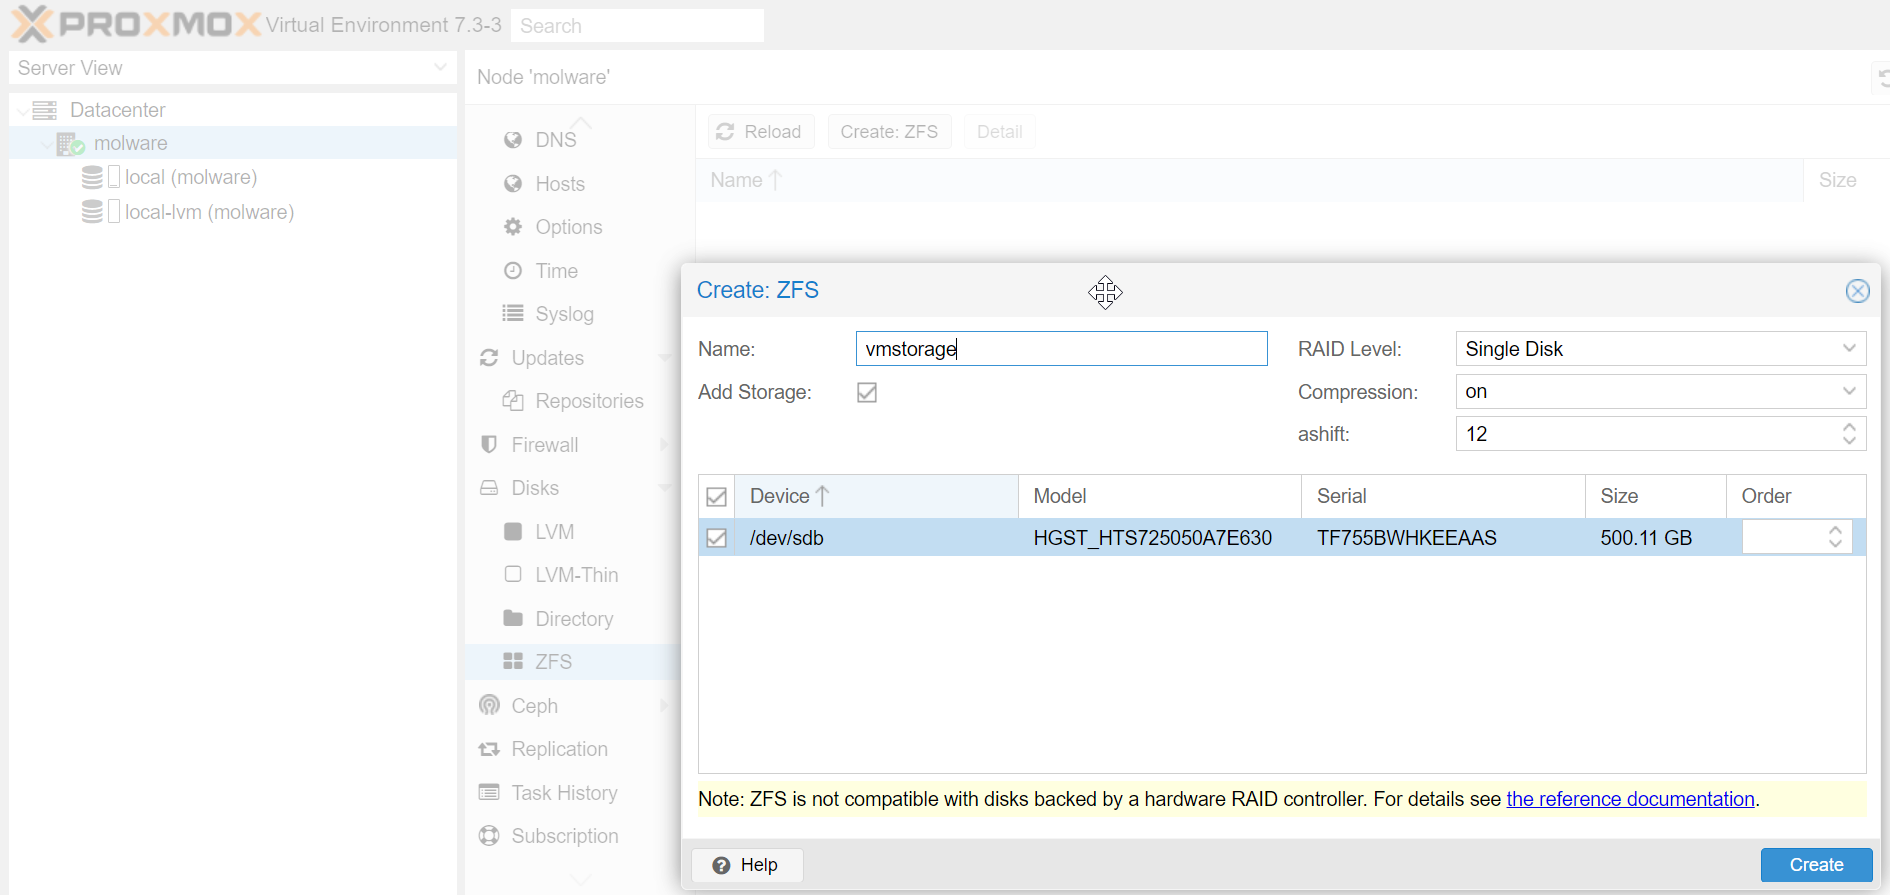
Now to get started with creating our lab in Proxmox, we need to initialize a place to store our Virtual machines and containers. In Proxmox we use the ZFS file system to store our VM’s and containers.
If we navigate to our PVE node and scroll down to ZFS, we can create a new ZFS file system on our empty VM storage disk.
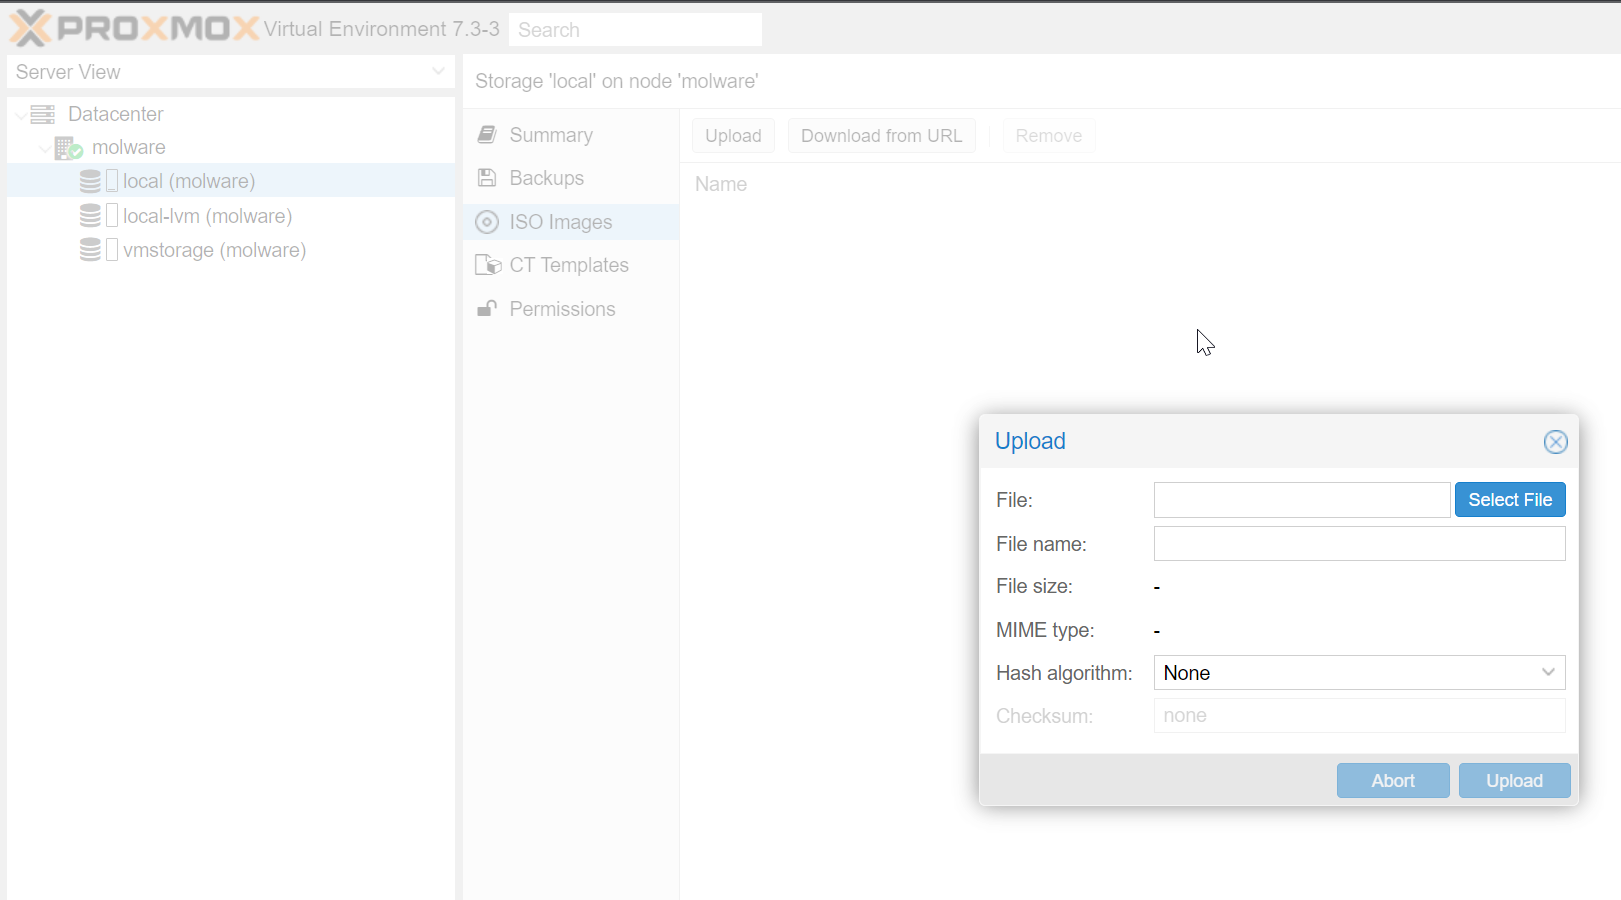
After creating ZFS we are ready to build VM’s and containers. In order to create a VM or container we need an image. Using the Proxmox UI we can upload iso images, Linux container images, and/or download URLs for the images themselves. Proxmox also has a list of container images for download in their UI that make deploying containers much easier.
We’ll upload a PfSense image, a Windows 11 iso, and an Ubuntu iso image.
After uploading our images we’re ready to create our first Virtual machine.
PfSense
We’ll create a PfSense virtual machine using the create VM button in the top-right corner of the proxmox console.
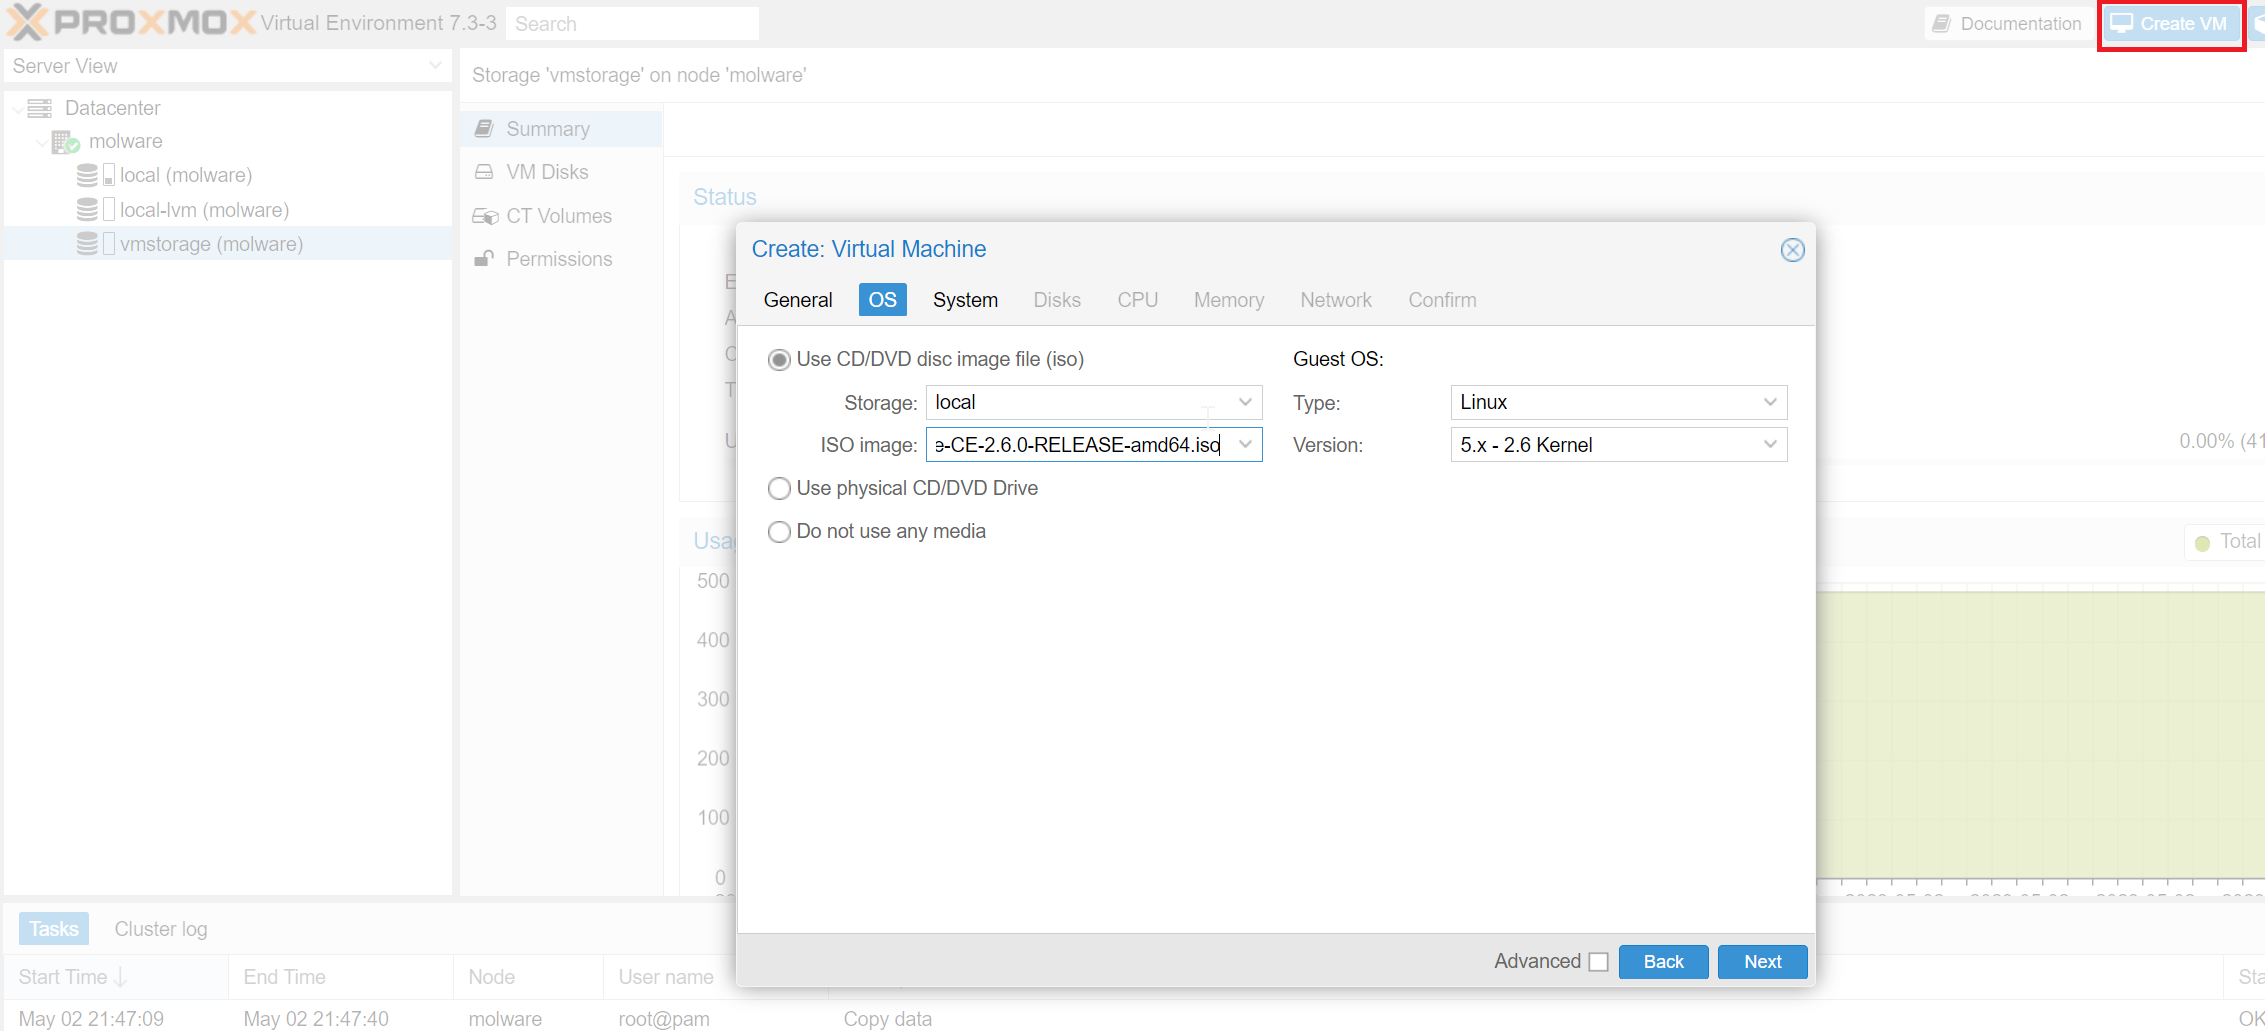
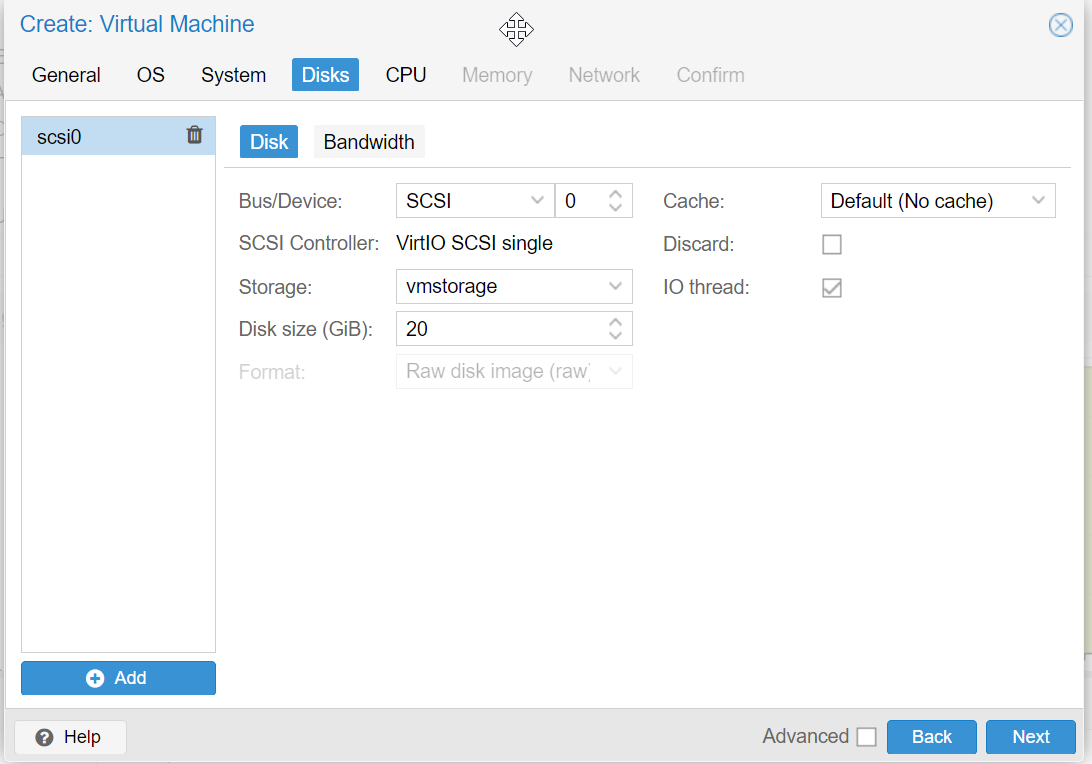
We’ll select our uploaded PfSense iso image and then configure our disks, ensuring that we use our ZFS pool for the vmstorage. We’ll make the disk 20GB with 1GB of RAM, and 1 NIC to start.
After it’s all set up, let’s boot our VM and follow the installation instructions to get PF installed on the virtual hard disk. Installation should be quick and will reboot the VM after completion.
When the PfSense VM starts up there will only be one NIC available which is intended. We need to configure the WAN interface with this. It should be the only interface available so either use the auto-detection or enter the interface name that gets presented by PfSense. This will configure a WAN interface on your PfSense firewall that should connect directly to your local network via the Linux bridge. As long as everything is configured properly this interface should have direct access to the Internet. We’ll have to repeat this step again when we attach the LAN adapters but I like to do this to make sure I know exactly which adapter is the WAN, and that it’s internet-connected properly.
At this point, we will shut off the VM because we need to add additional network interface cards for the other LAN networks we’re going to create in our lab.
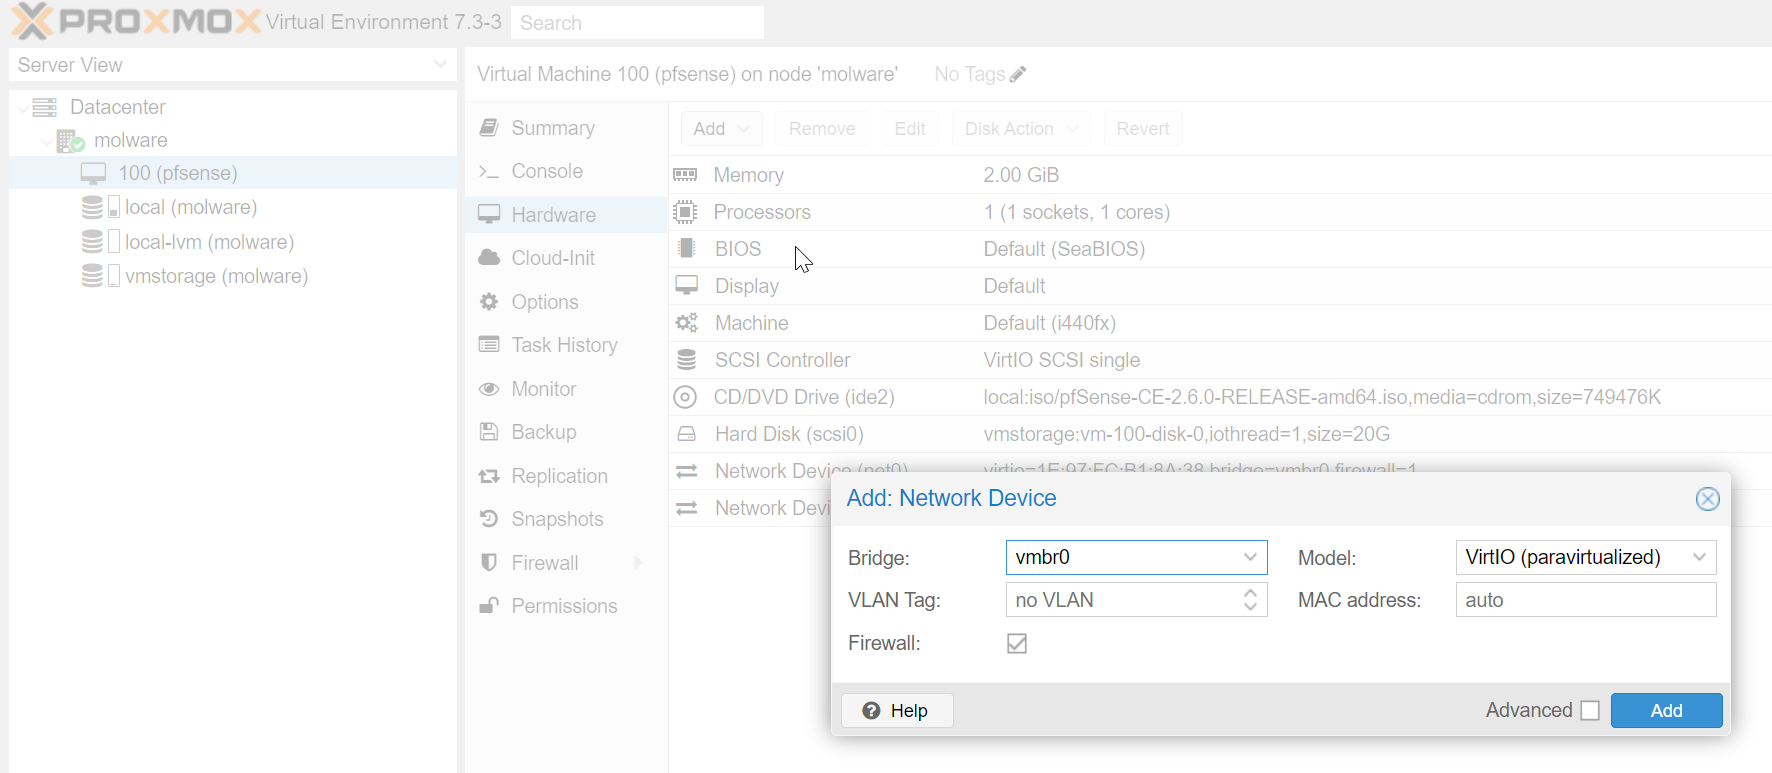
In the Proxmox UI navigate to your node and select ‘Network’ from the menu. Here we will add two new Linux bridges, and assign them IP addresses and a /24 CIDR.
vmbr1 - 192.168.56.1/24vmbr2 - 192.168.57.1/24

We will dedicate these two bridge networks to separate LANs for our homelab. Now we’ll navigate back to the settings for our PfSense VM and add both network bridges to the VM settings.
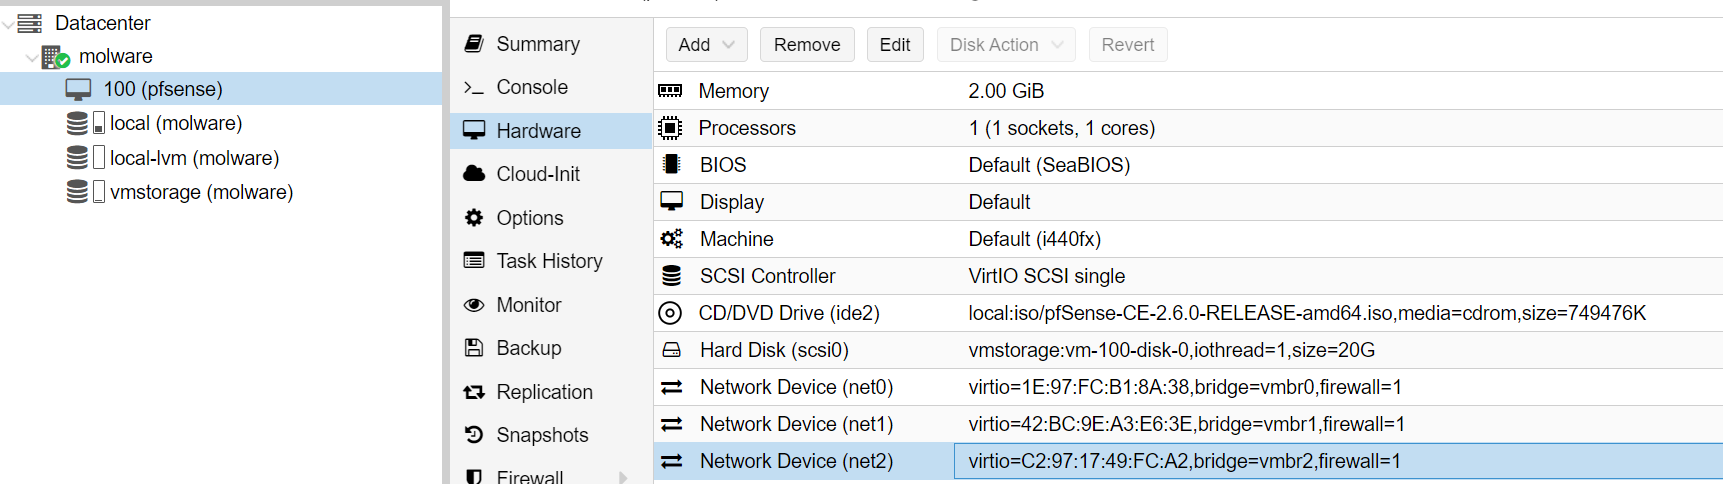
After completion, our VM settings should have all three NICs connected. Now we have to configure them.
Let’s start our PfSense VM backup. Our WAN interface should be configured and working, but now we’ll have to configure the two LAN network interfaces. We can do this by selecting option 1, Assign Interfaces in the PfSense menu. This will bring us to a menu where we can assign our newly attached virtual NICs to our PfSense.
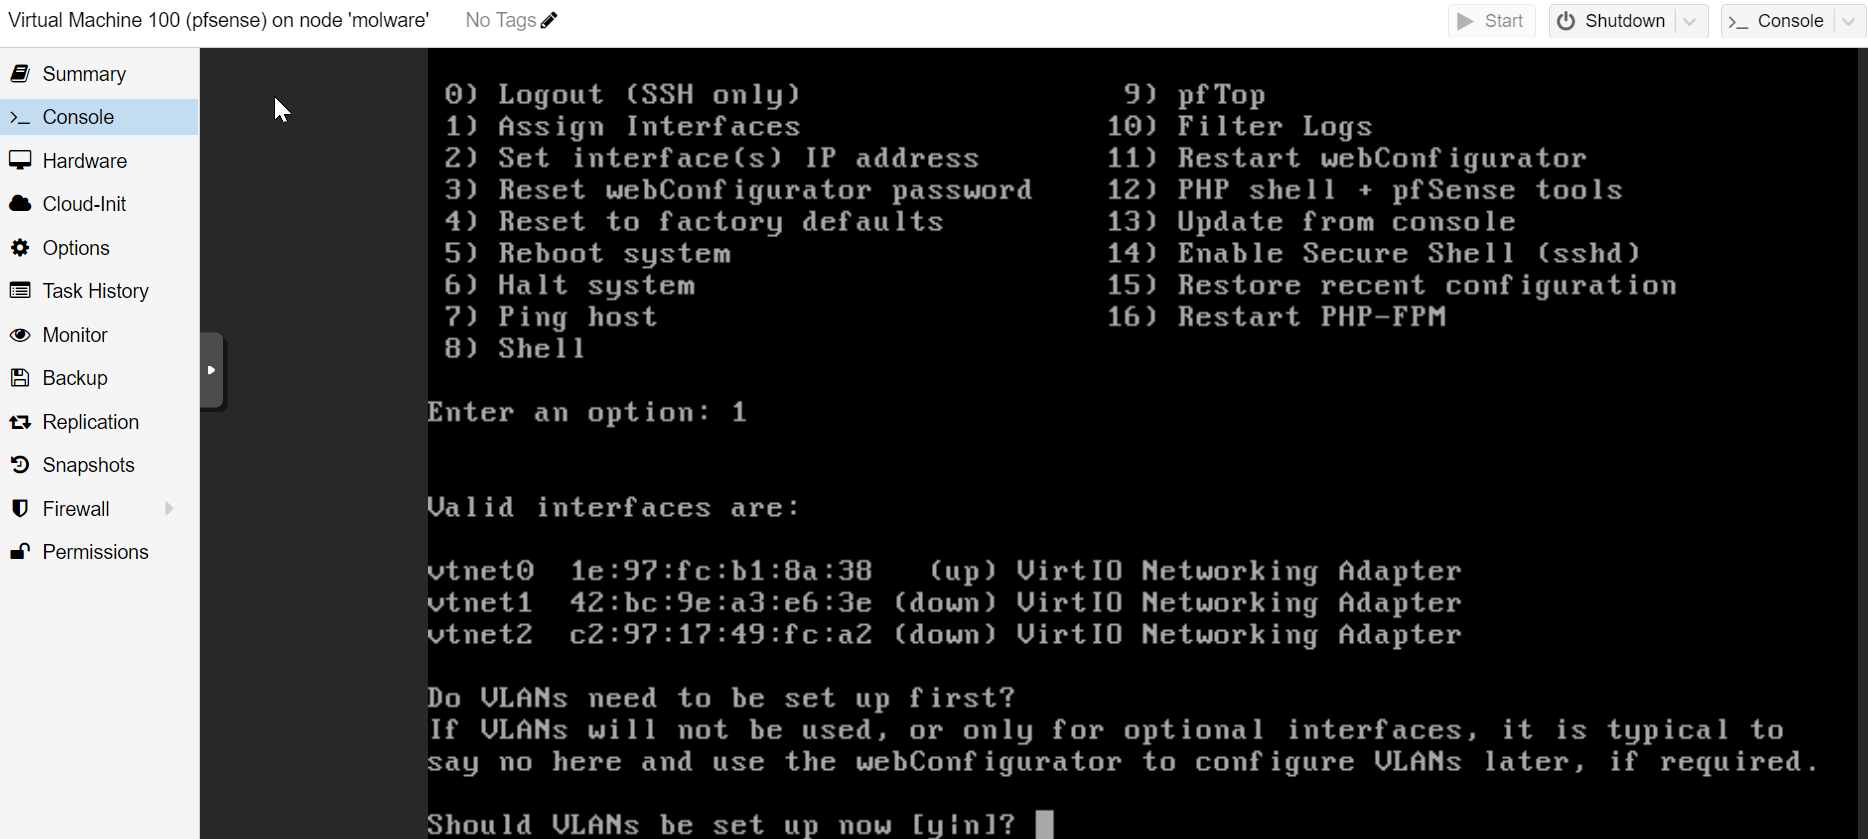
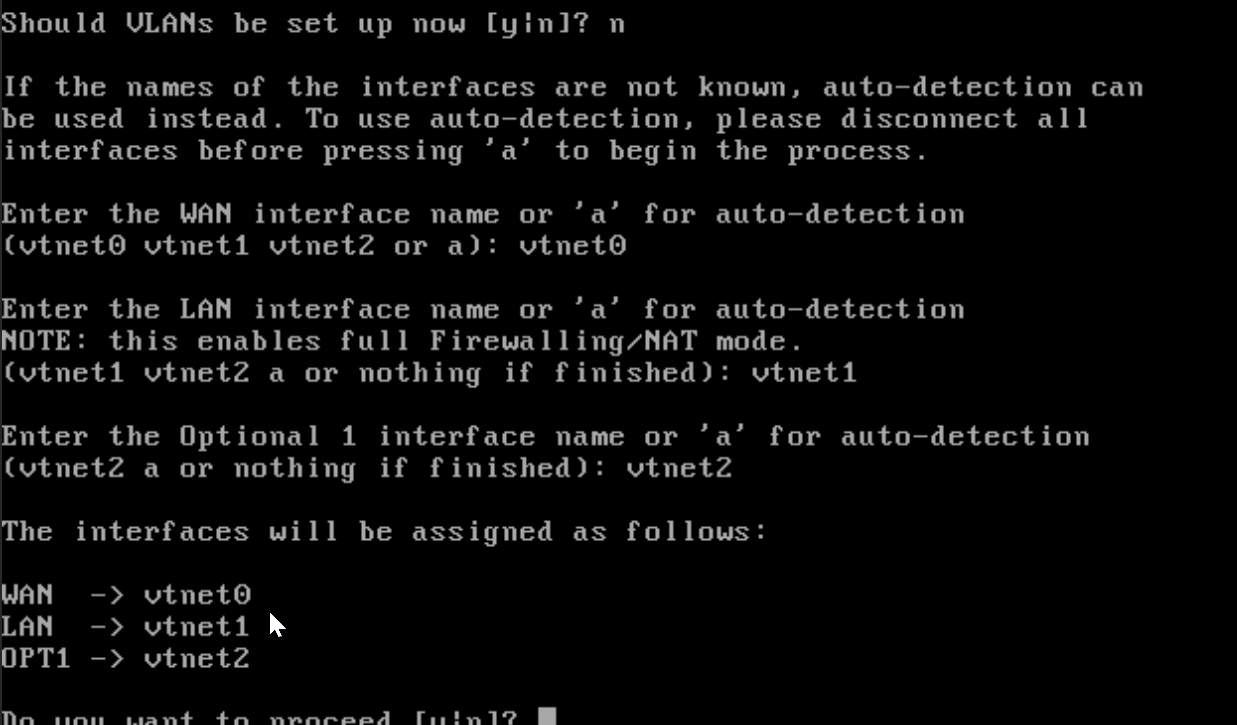
We’ll skip VLANs for now, but we’ll go ahead and assign our interfaces. We’ll select vtnet0 for our WAN as we did previously leaving everything else as default.
We’ll select vtnet1 as our first LAN, and vtnet2 as our second LAN. Once done, we’ll confirm our options here, and move on to assigning IP addresses for our newly assigned interfaces.
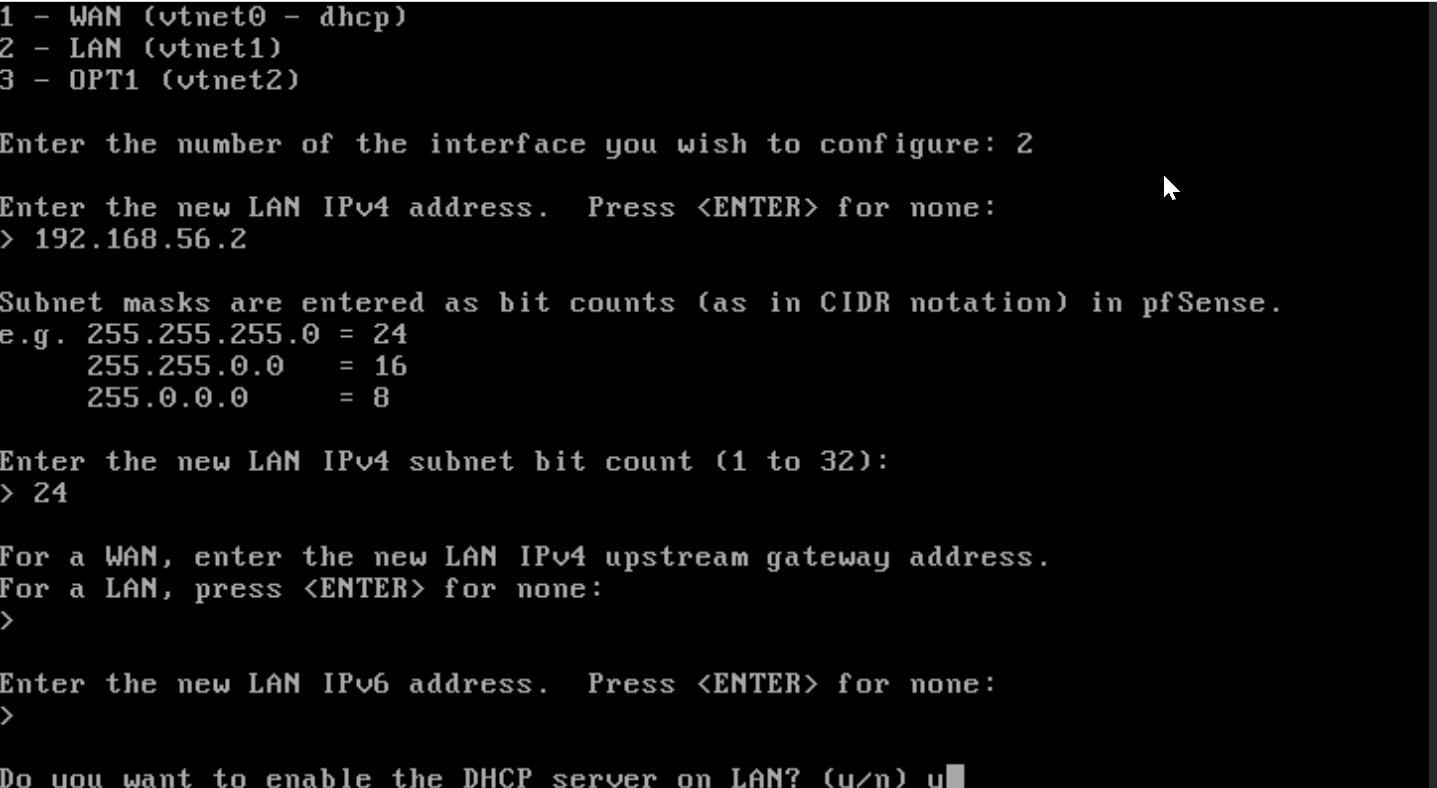
We’ll be returned to the PfSense menu and now we’ll select option 2 for “Set Interface(s) IP Address. Here we will configure the IP addresses of the two LANs to match what we created for the PfSense bridge adapters.
For vtnet1 we’ll configure the following:
- IP:
192.168.56.2 - CIDR:
/24 - DHCP:
y - DHCP Range:
192.168.56.3 - 192.168.56.254
We’re setting the IP to 192.168.56.2 since 192.168.56.1 is reserved for the hypervisor via the bridge we created earlier. You can use any IP but this makes logical sense to me and I like to keep consistency across all the LANs. We’re enabling DHCP so that our PfSense firewall will automatically assign IP addresses to any VM’s that we connect to the vmbr1 bride/vtnet1 LAN.
We’ll repeat the process for the 2nd LAN network, vtnet, as follows:
- IP:
192.168.57.2 - CIDR:
/24 - DHCP:
y - DHCP Range:
192.168.57.3 - 192.168.57.254
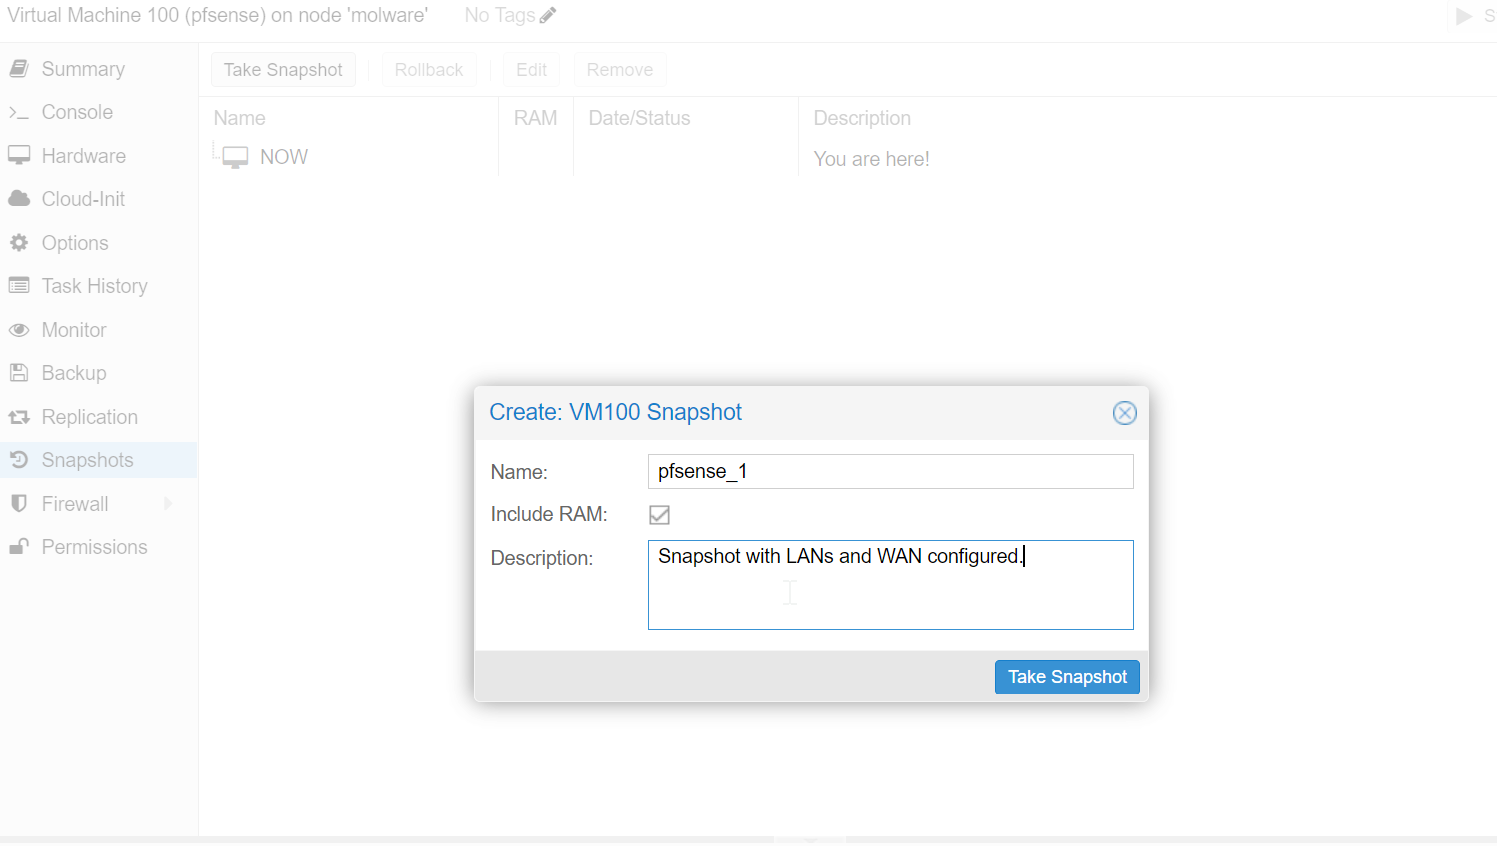
Now’s also a good time to take a snapshot just in case we run into any issues with our PfSense VM in the future.
After that’s all said and done, our PfSense configuration is complete! There’s a lot more to configure in PfSense but we’ll cover that later on.
For now we’ll move on to creating our Windows VM.
Windows VM
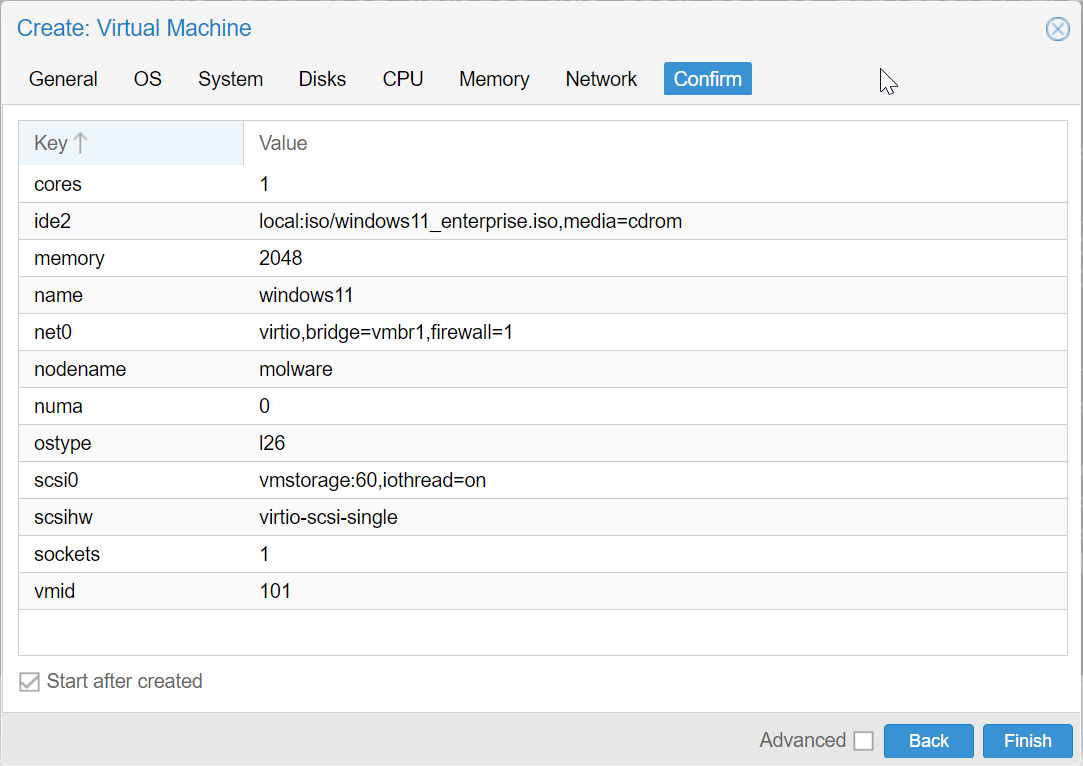
For our Windows VM we’ll navigate to the Create VM and configure our VM with the iso file we uploaded previously. Be sure to select the correct storage location for the Virtual machine, and to connect the VM with one of our newly created bridge adapters. Remember we want our device to be joined to a LAN network under pfsense. If you select the default network interface it will connect directly to the network which will not allow for proper segmentation as intended.
I’ve configured this VM with 64GB of storage, 4GB of memory, our single NIC(vtnet1/vmbr1), 1 CPU, and 2 cores to meet Windows 11 system requirements.
Windows 11 has some dependencies that are a little tricky to configure so I documented the exact configuration steps on this post.
After getting Windows 11 installed we’ll launch the VM and follow the installation steps. If you downloaded a Windows 11 Enterprise image you’ll need to select the ‘domain join’ option to create an offline account.
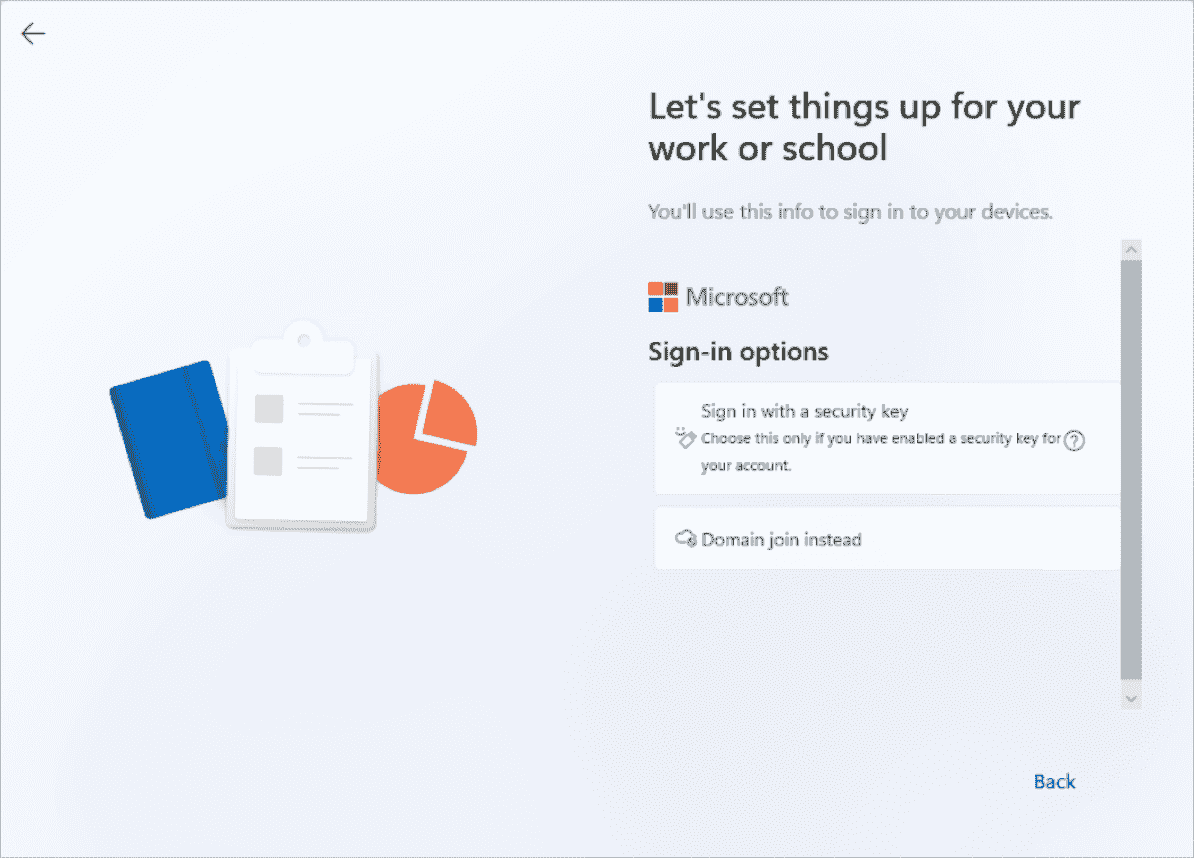
Once setup is complete, you now have a fully ready Windows 11 VM! The VM is connected to the LAN of the PfSense firewall we configured earlier so it has an outbound route to the internet via the PfSense WAN.
Now’s also a good time to take a snapshot of our Windows VM via the snapshot menu. This helps us revert to a clean state in case anything goes rung with our VM. Additionally, it resets the timer on the evaluation license of our Windows VM so that we can use it for testing after the 90-day evaluation is up!
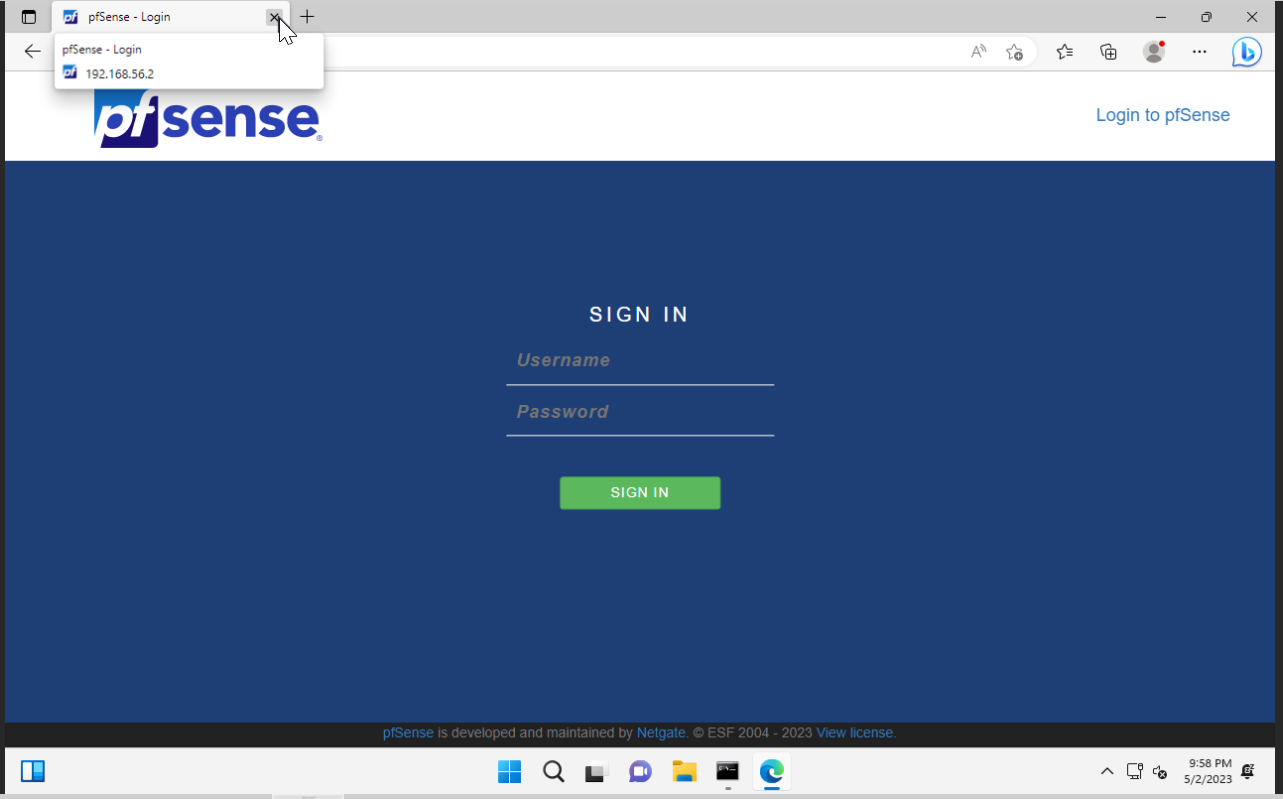
Since this is our first VM on our LAN, we can use this VM to navigate to our PfSense web interface, by browsing to the LAN IP we assigned earlier.
https://192.168.56.2
This will bring us to the PfSense admin page where we can log in with the following credentials:
Username: admin
Password: pfsense
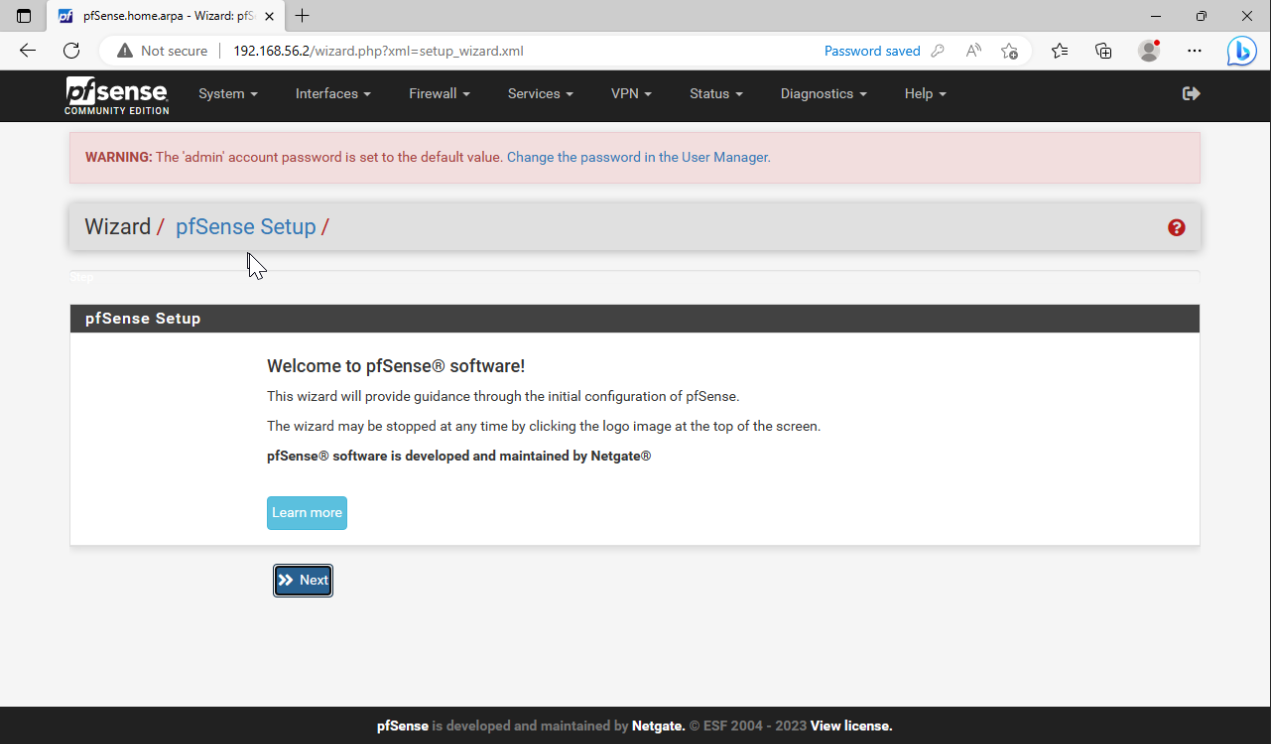
We can now administer and configure our PfSense firewall via the Web console. Here is where we can create firewall rules to segment parts of our lab, install plugins, view logs, and troubleshoot issues with our firewall configuration. For more PfSense-specific content please click on the PfSense tag at the top of the blog post to learn about some interesting things you can do with it.
For now, we’ll move on to Splunk Installation!
Splunk
The scope of this section will cover the installation of Splunk, but not the configuration. Select the Splunk tag to see posts related to Splunk configuration and search capabilities.
Now to configure and install Splunk we’re going to take advantage of Proxmox’s ability to create Linux containers. First, we need to download a container image. Let’s navigate to the container templates menu and select Download from URL. Select any Linux container image you’d like. I’ll go ahead and use an Ubuntu image for familiarity.
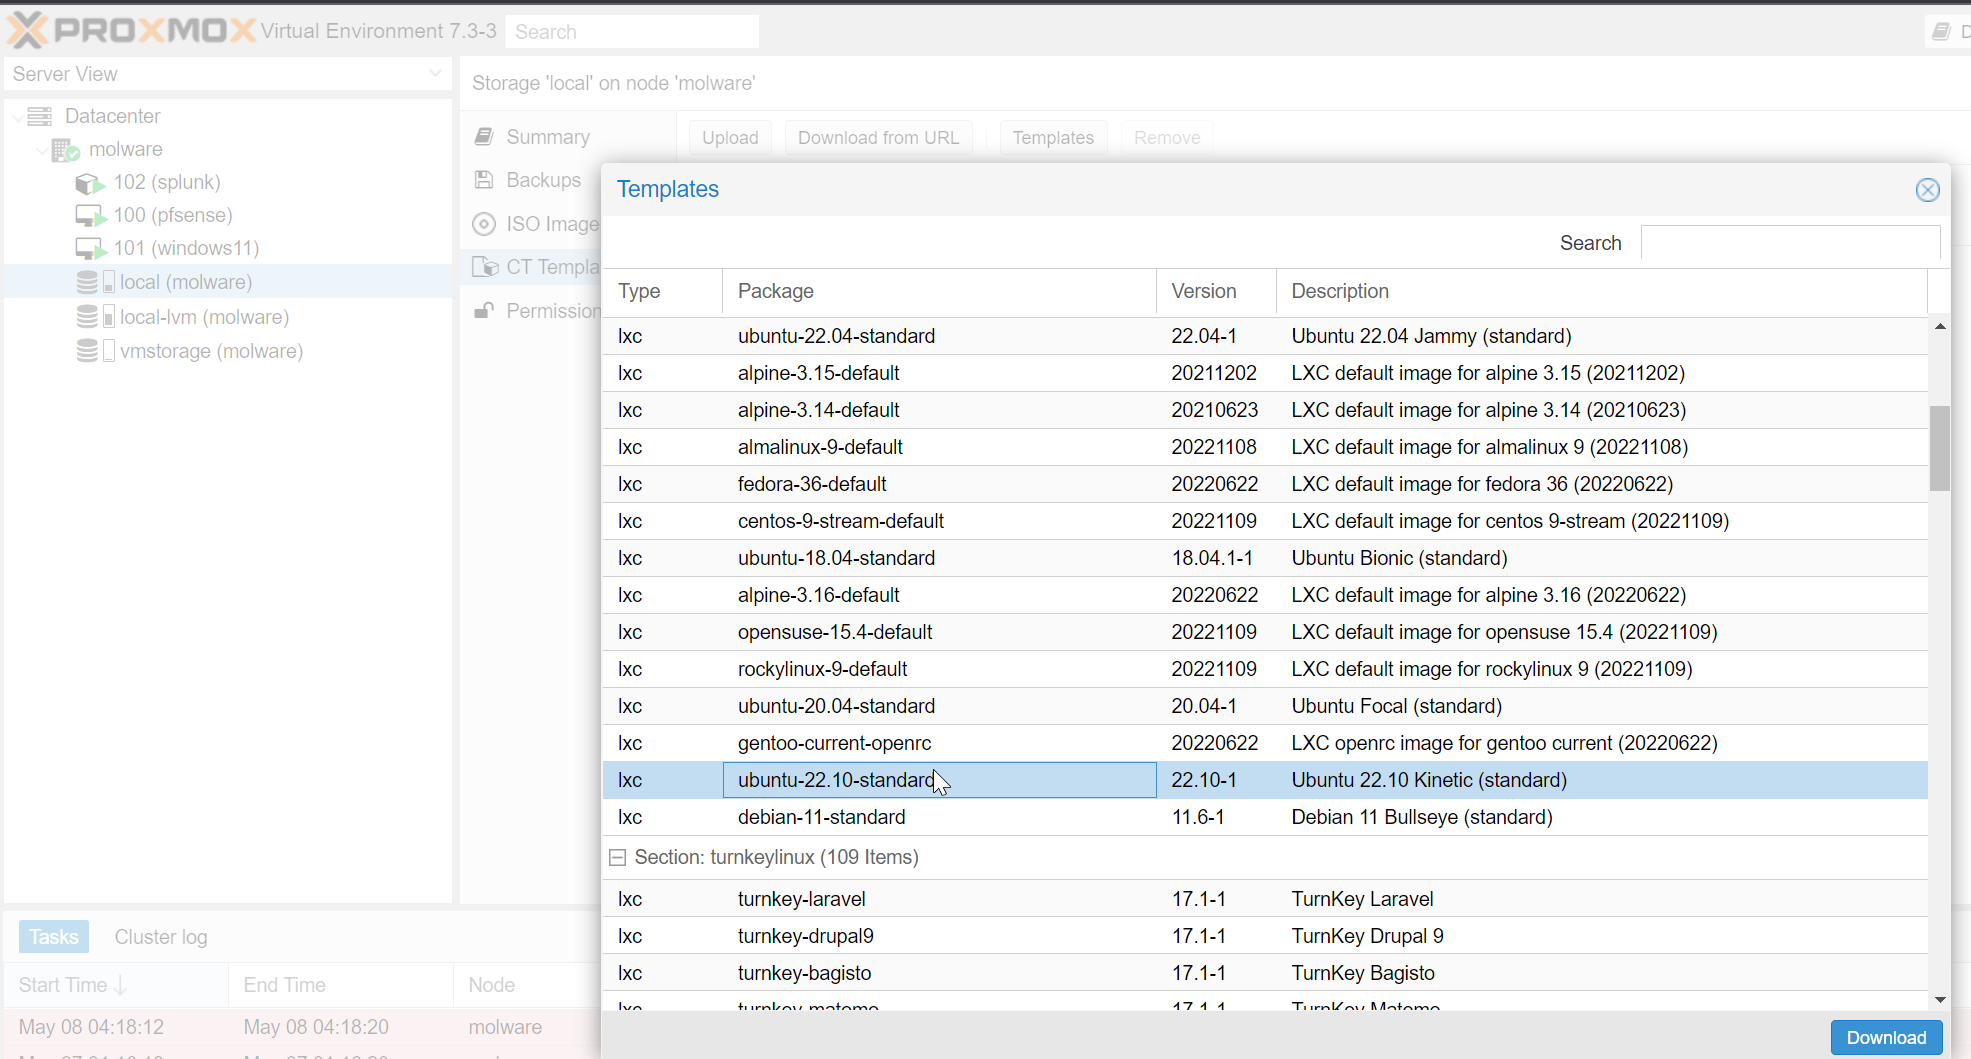
After downloading the image we’re now ready to create our container. At the top right of the web UI we’re going to select Create CT instead of Create VM like we did last time. This will bring us to our container configuration menu.
We’ll configure this container with 1GB of RAM, 1 core, and 60 GB of storage since we expect our Splunk instance to collect a lot of data. We’ll add the vmbr1 network bridge so that our Splunk instance can be connected to our PfSense Lan 1. I’d recommend setting a static IP for the Splunk instance so you can always navigate to its UI, and also have a dedicated IP for forwarding your logs. After creating the container you can always add additional NICs to allow Splunk to connect to other LANs or even give it an IP on your local network via your vmbr0 bridge adapter.
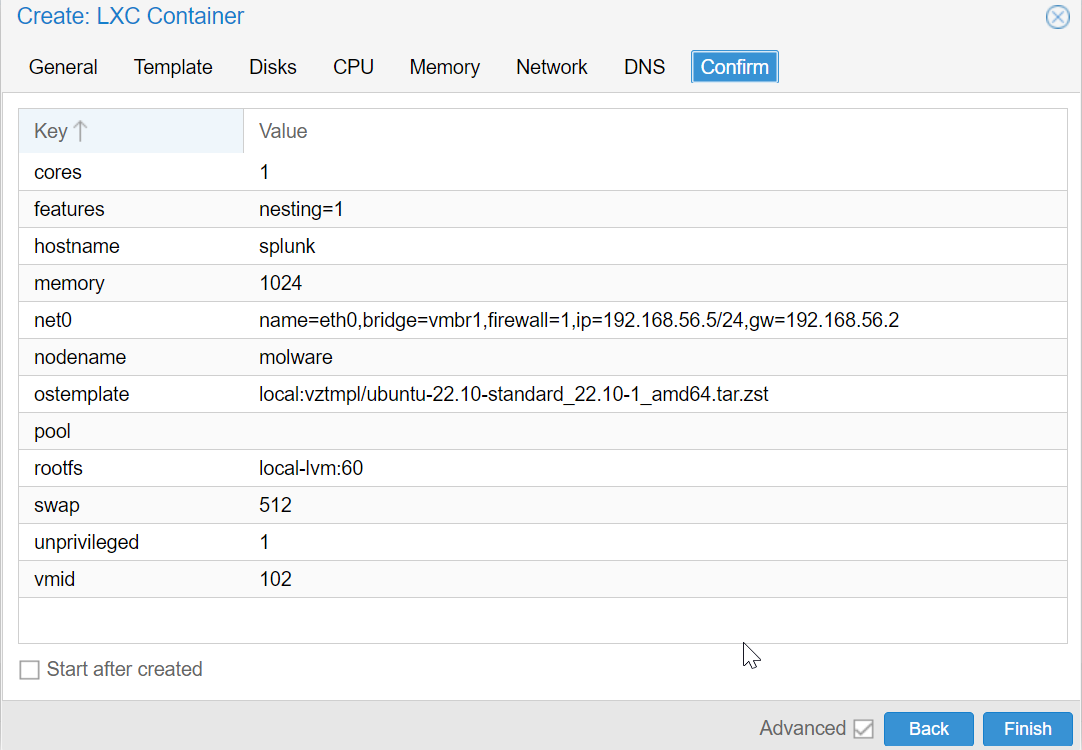
After creating the container, we can start it and log in with the root user and the password we set when creating the container.
To install Splunk we’ll navigate to the Splunk download page, and select “Download via Command Line (wget).” This will give us a wget command that we can paste directly into our container that will directly download the Splunk “.deb” package file.
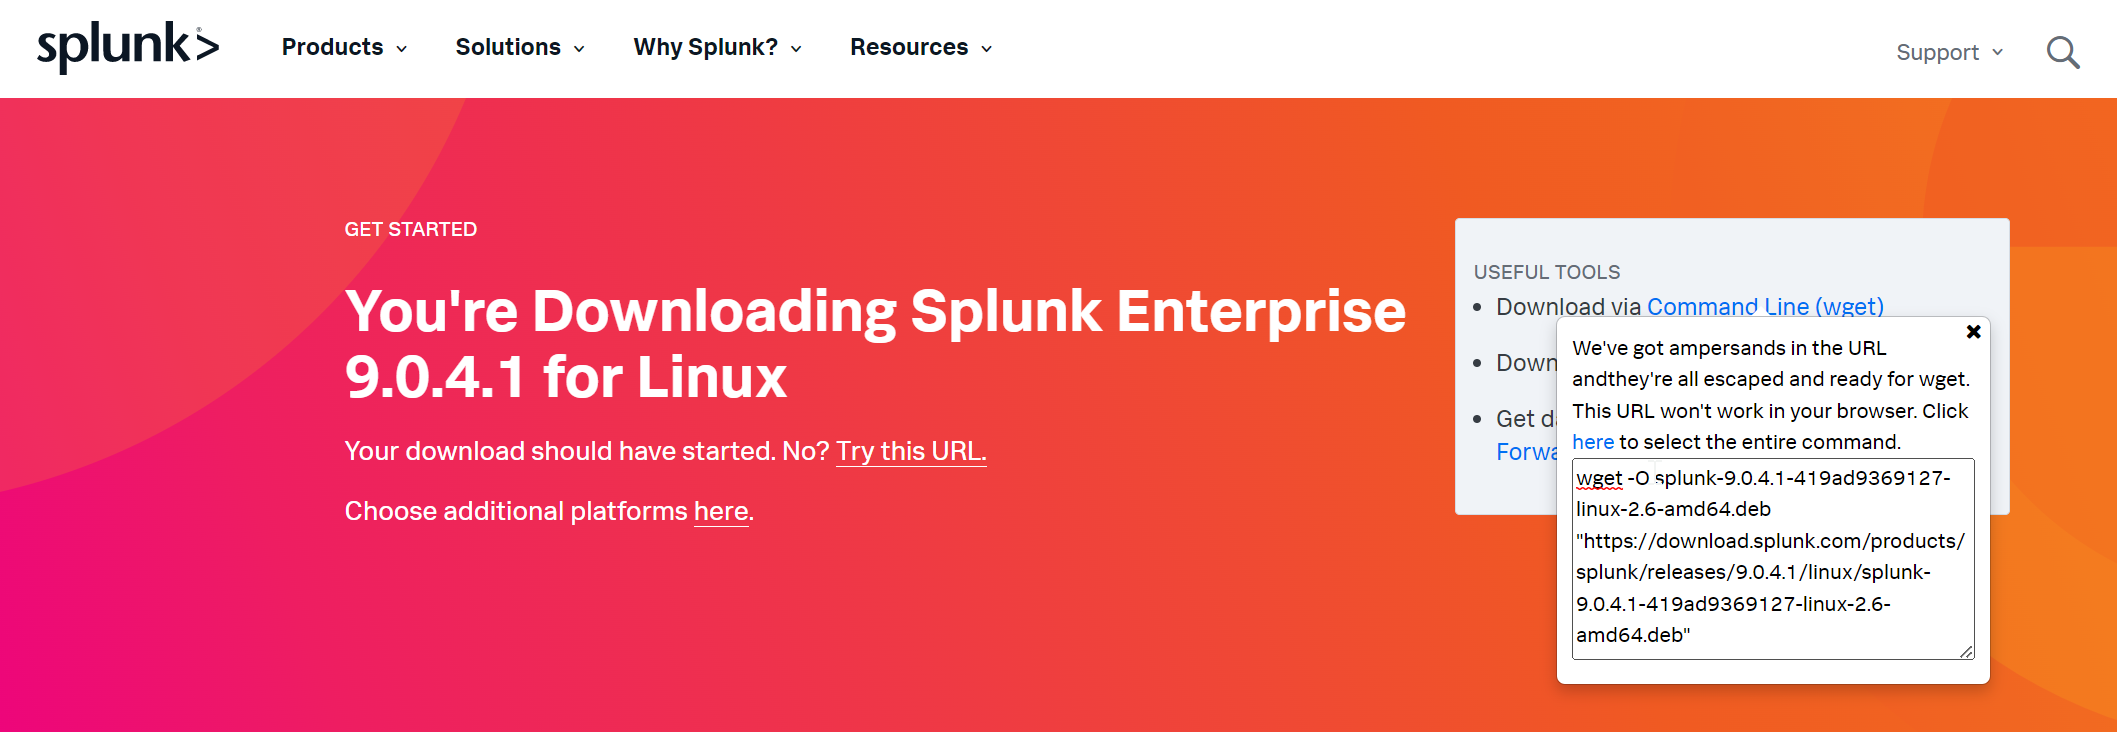
In our container we’ll run:
wget -O splunk-9.0.4.1-419ad9369127-linux-2.6-amd64.deb "https://download.splunk.com/products/splunk/releases/9.0.4.1/linux/splunk-9.0.4.1-419ad9369127-linux-2.6-amd64.deb"

dpkg -i splunk-9.0.4.1-419ad9369127-linux-2.6-amd64.deb
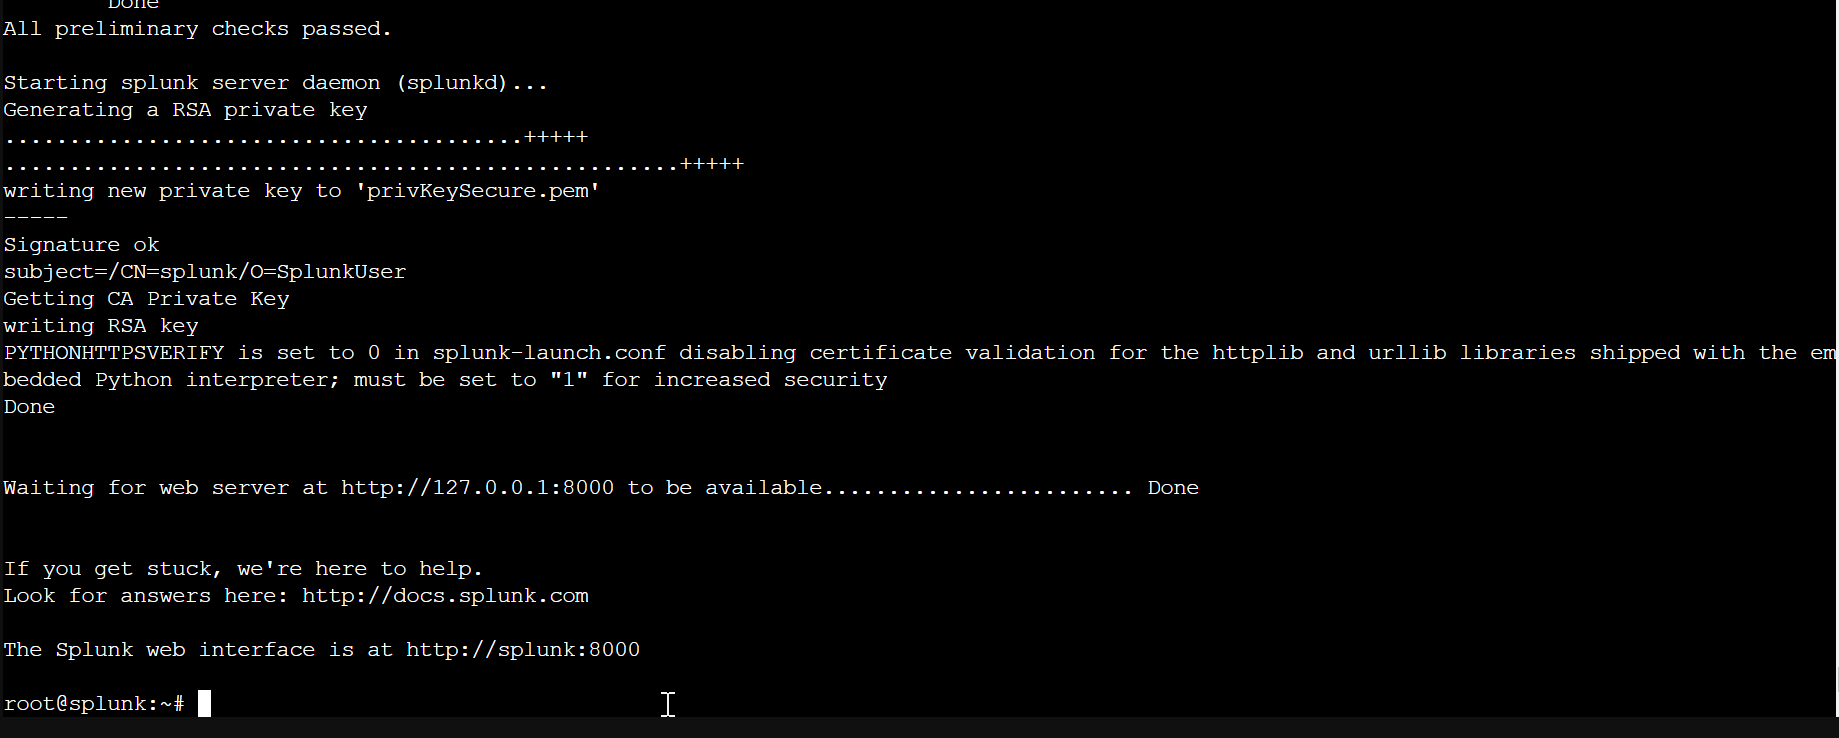
The second command installs the downloaded Splunk debian package for us. After installation let’s run the Splunk binary:
/opt/splunk/bin/splunk start
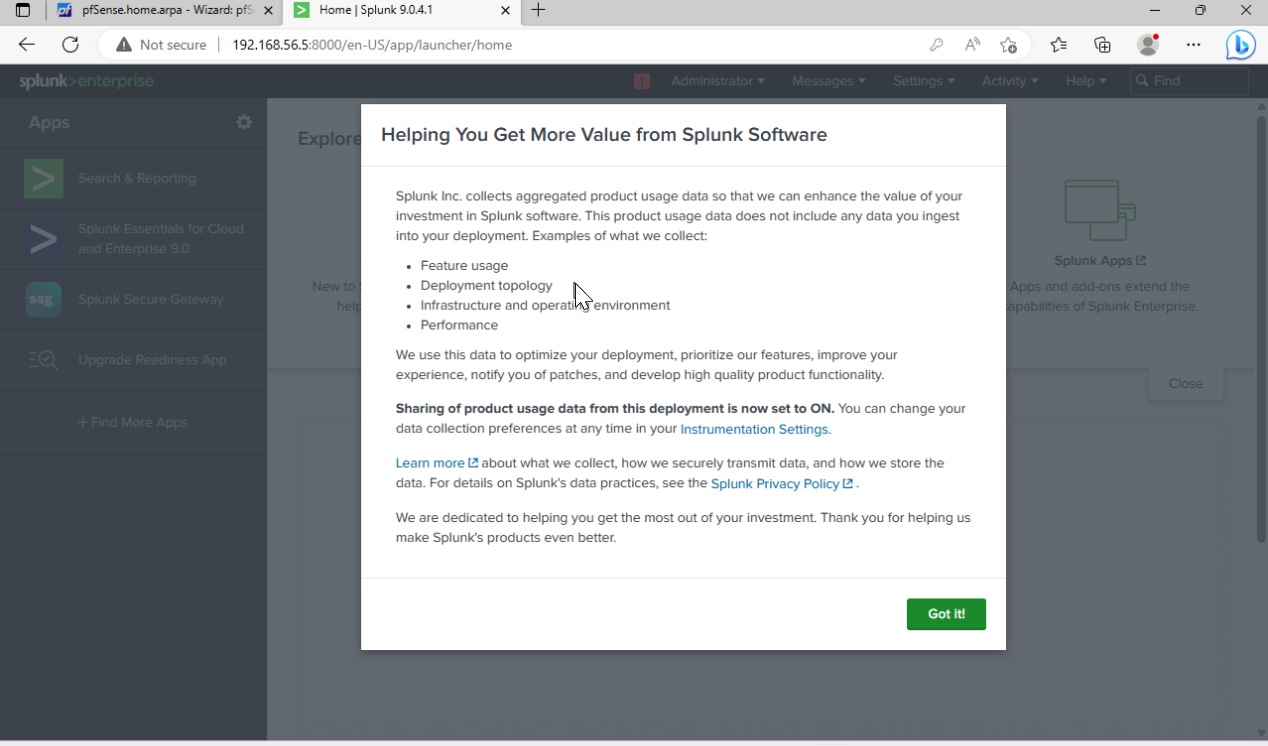
Splunk will ask us to agree to their license and create an admin user, and password. Afterward, Splunk will launch the web interface and host it on port 8000.
We can now use our Windows VM(or any other configured VM’s) to navigate to our Splunk web interface at the static IP we configured for Splunk earlier.
https://192.168.56.5:8000
After logging in we’re now able to use and administer our Splunk instance!
From here we can configure our Splunk to collect logs from our PfSense, Windows, and any other virtual machines we have in our lab environment. For more Splunk-specific content please click on the Splunk tag at the top of the blog post to learn about some interesting things you can do with it.
Some additional Proxmox tips:
In the Proxmox Web UI you can set your VMs and containers to automatically start at boot and in what order. I highly suggest setting the order to PfSense first, your log analysis platform second, and then everything else afterward.

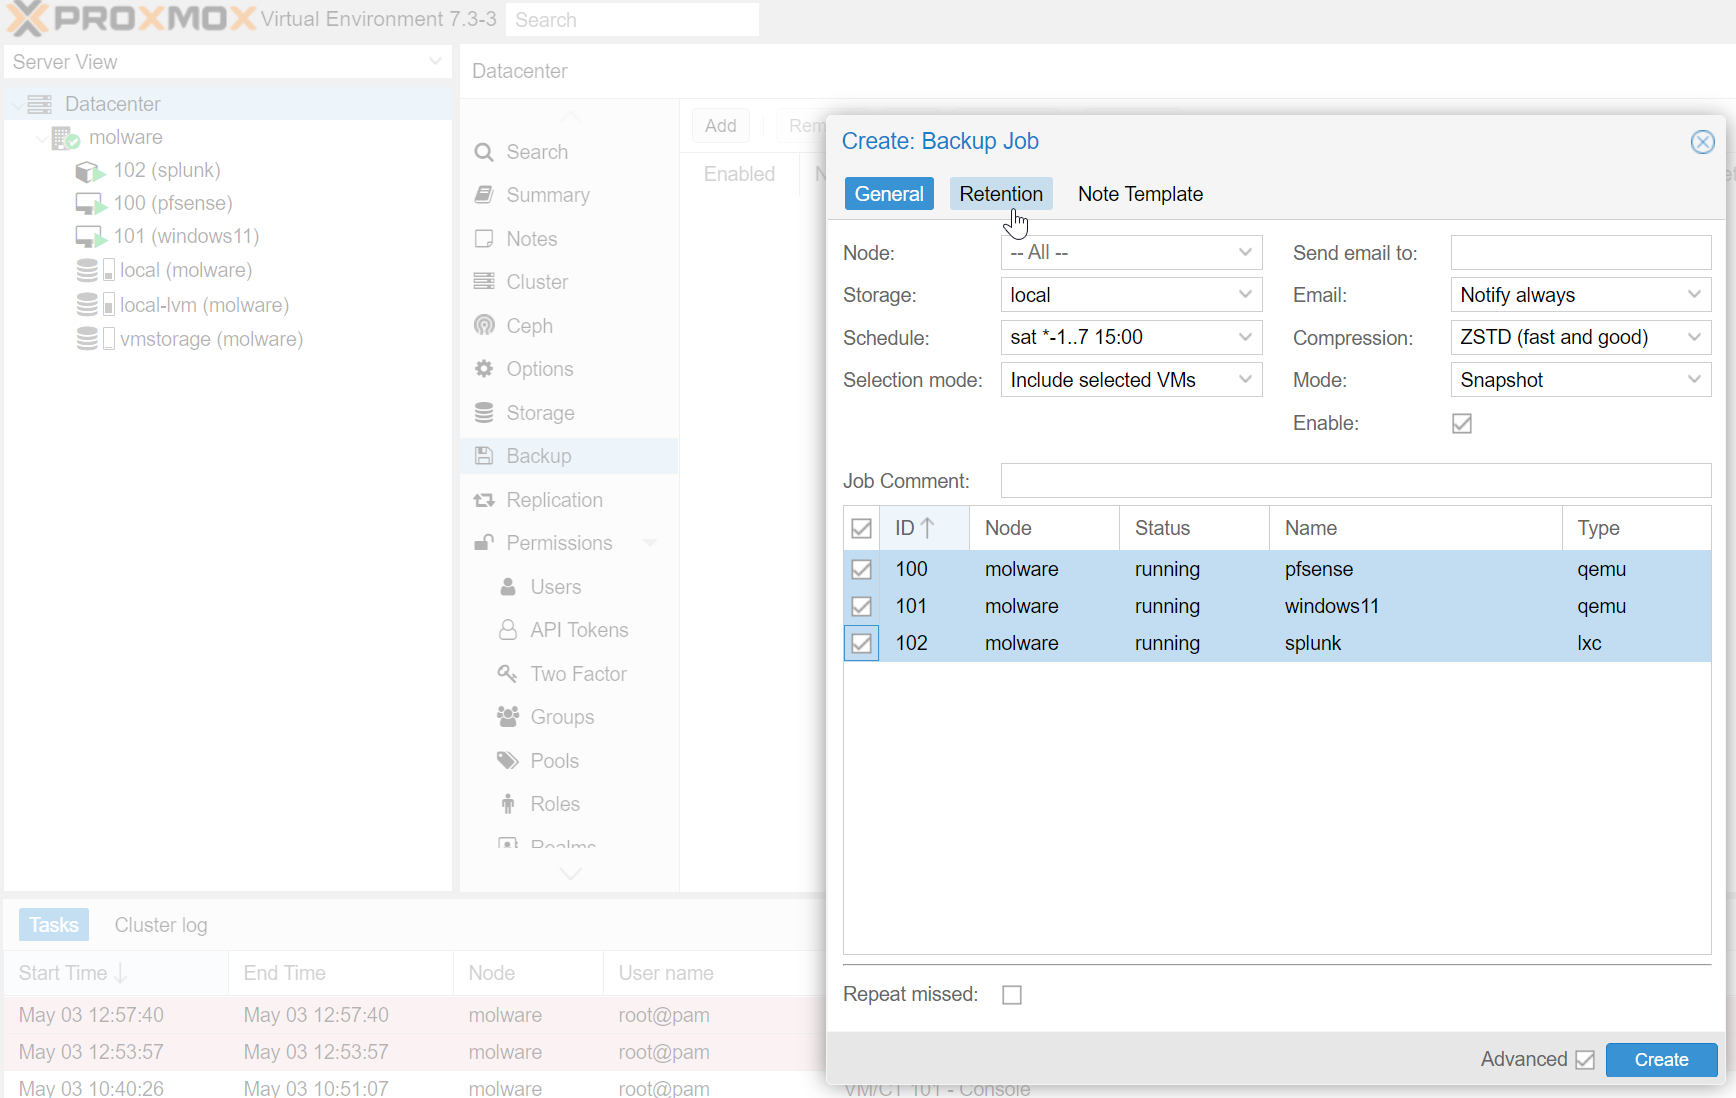
Proxmox has a backup feature that is very handy for automatically performing full backups of your VMs and container. I typically schedule my backups once a week and keep up to 4 backups at a time.
Note: Before configuring backups you must define the storage area for your backups
Wrapping Up
So we’ve built a very basic homelab in Proxmox that allows us to have VM’s on separate LAN networks while also having a logging platform for doing analysis. This lab is scalable and will allow for us to do tons of research and testing to learn how to secure networks and computer systems. As stated in my previous blog post, adding a Linux VM is a pretty good foundation and an easy way to expand upon this barebones lab setup.
There’s a lot of flexibility in this lab setup and you can certainly configure your lab setup however you see fit. My personal lab is actually on a separate firewalled LAN on my home network which allows me to use a type-2 hypervisor like VmWare to interact directly with the VM’s in my lab for scanning and launching attacks. There are tons of ways to configure and expand in your homelab and this is just a starting point to help you expand. Happy homelabbing!
To see more homelab posts, click the homelab tag at the top of the page.