Now that we’ve established hardware requirements, and selected the foundation for our homelab we can begin to explore how we will design our homelab envrionments.
Basic Homelab Setup
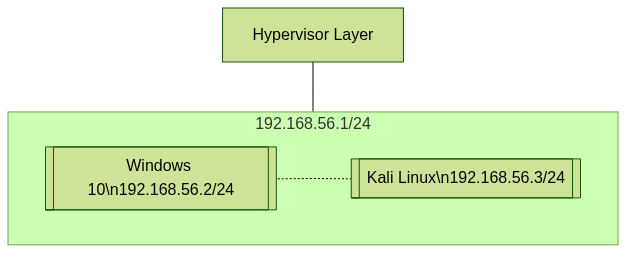
As stated in Part 1, the simplest homelab setup consists of a single Windows machine and a Linux virtual machine. There are no tricks or bells and whistles, what we have here is two hosts on the same LAN that will be able to communicate with one another. I always opt to draw the hypervisor layer in my diagrams because the hypervisor is a very important part of your homelab. The hypervisor layer can interact directly with any of the virtual machines without restrictions. This allows your hypervisor to also be part of the homelab giving you additional resources. However, I would not recommend doing this with type-1 hypervisors like ESXi/Proxmox because they are dedicated to administering and managing the virtual environment. This type of homelab setup will allow you to interact with and/or launch attacks from the Kali Linux VM to the Windows virtual machine. Activity can be monitored from hypervisor or from either of the virtual machines.
The dotted-line drawn between the two virtual machines does not mean that they are connected to each other, but is being used to show that they are on the same network and can communicate with each other. This is also depicted by the address for the subnet(192.168.56.1) which also happens to be the IP address of the hypervisor.
Basic Homelab + Firewall
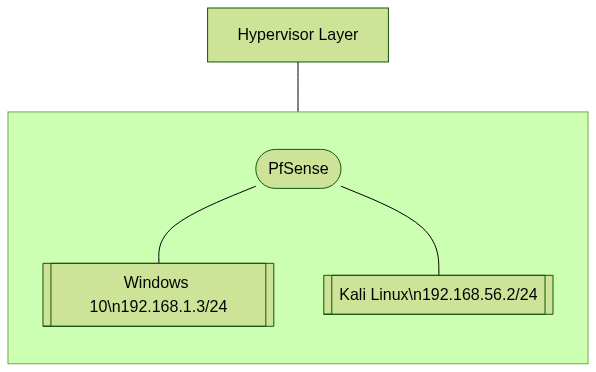
In this setup we’ve added a virtual PfSense firewall to segment and control the traffic between the two virtual machines. As you’ll come to learn the PfSense firewall is near and dear to my heart, being an open-source firewall with tons of plugins and support(I’ll have another blog post dedicated to some PfSense features in the future).
Notice that the two virtual machines have different subnet addresses. The Windows 10 VM is on the 192.168.1 subnet, and the Kali machine is on the 192.168.56 subnet. These two virtual machines will be unable to communicate with one another directly. The traffic must pass through the PfSense firewall that they are connected to. The reason for adding the firewall is that it allows an array of configuration options and will help us learn how to deploy and leverage firewalls for network segementation. Additionally, we can leverage firewall logs to begin our forays into log analysis.
Homelab + Firewall + SIEM
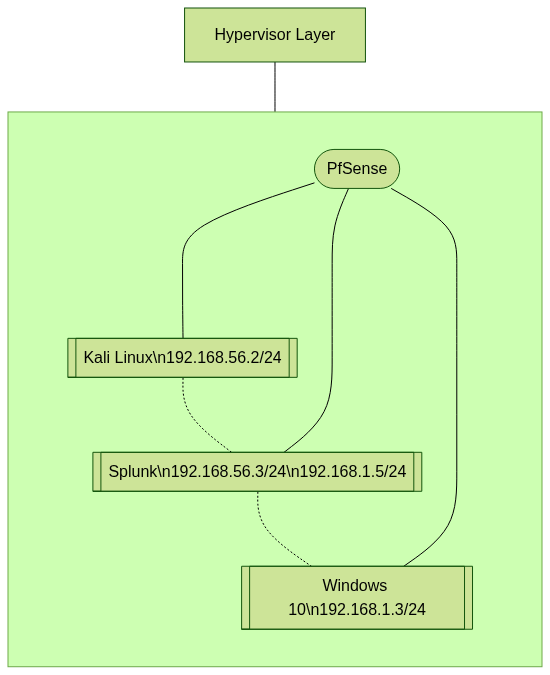
In this configuration we’ve added Splunk to our homelab to aid in log collection and analysis. The network configuration here allows Splunk to talk to both the Kali and Windows virtual machines in order to collect logs. Note, the Splunk and Kali VM’s are still on different subnets, and must be allowed to communicate through PfSense in order to communicate with each other. Here, Splunk is configured with two NICs in order to communicate with both of the virtual machines(on separate LANs) for the purposes of log collection.
An alternative is to place Splunk on its own LAN/VLAN or subnet and add some firewall rules to restrict Splunk comunication to be on log collection ports. This is a best practice and would be more indicative of an enterprise network configuration and may help you practice configuring firewall rules as well.

You can replace Splunk with ElasticSearch if you’re able to configure it. Splunk is easier to configure, and a bit more user friendly, but the free version does have some limitations such as only being able to ingest 500MB of data per day. ElasticSearch will allow for much more retention but you’ll need to configure the entire ELK stack (Elasticsearch, Logstash, Kibana).
Scaling
In each of these setups you can scale your homelab seemingly endlessly by defining new networks, or adding new virtual machines as resources permit. Be sure to leverage LAN and VLAN segmentation via your virtual firewall to have better control of which systems can talk to one another and over which ports. Leveraging an open source firewall like PfSense with its large amount of plugins will allow you to be able to add features to your homelab like Snort/Suricata IDS, and squid proxy; giving you additional logs for troubleshooting and experimenting in your homelab. I’ll cover PfSense plugins in a future blog post.
Depending on the hypervisor you selected my go-to would be to replace any Linux virtual machines with docker or Linux containers. These barebones isolated containers will be more efficient and will allow you to deploy many services and expand your homelab without consuming too many resources.
Now that we have some design ideas, let’s go ahead and actually build a lab!